> ## Documentation Index
> Fetch the complete documentation index at: https://docs.flexwash.com/llms.txt
> Use this file to discover all available pages before exploring further.
# Magnetic Gates
> Basic troubleshooting steps for the Magnetic gates.
The advice provided here is just advice that we think may help. These gates
are high voltage machines and you should always check with a license
electrician or contact the manufacturer first. FlexWash assumes no liability
for any injury financial or otherwise.
## Gate not opening after wash purchase
The first thing you want to do is remove the top lid of the gate and check if the screen is on. If the screen is off, that indicates that the gate is turned off or not receiving any power, in which case the next step would be to check on the power switch.\
\
If the screen is on, you should follow these steps:
1. Test the gate by opening it manually.
2. If the gate moves:
3. Check the programming mode.
4. Check if there is an error icon on the screen. If there is one, proceed to turn the gate off.
5. Remove the ethernet cable, and then plug it back in making sure that it is plugged in correctly. Also check that the cable is connected properly on the other end, on the Switch inside the office.
6. Turn the gate back on.
## Programming mode
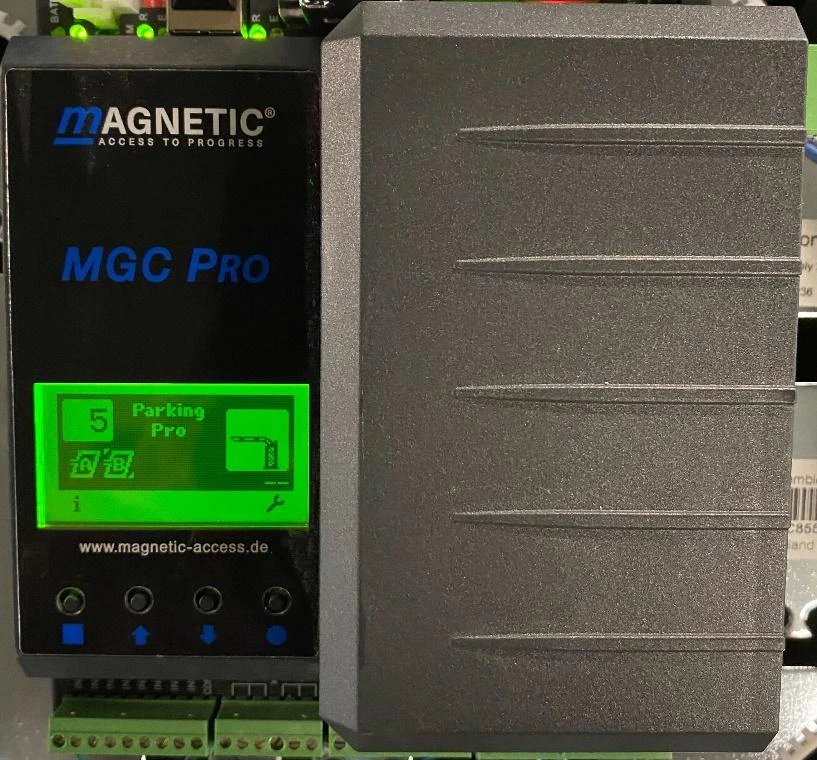
On the left side of the screen you should see the number 7. Any other number indicates that the gates are not in the correct programming mode.
To set the correct programming mode:
1. Press the circle button below the screen to open the main menu.
2. Select the “Function” option.
1. Set the programming mode to 7.
2. Save the change by pressing the circle button again.
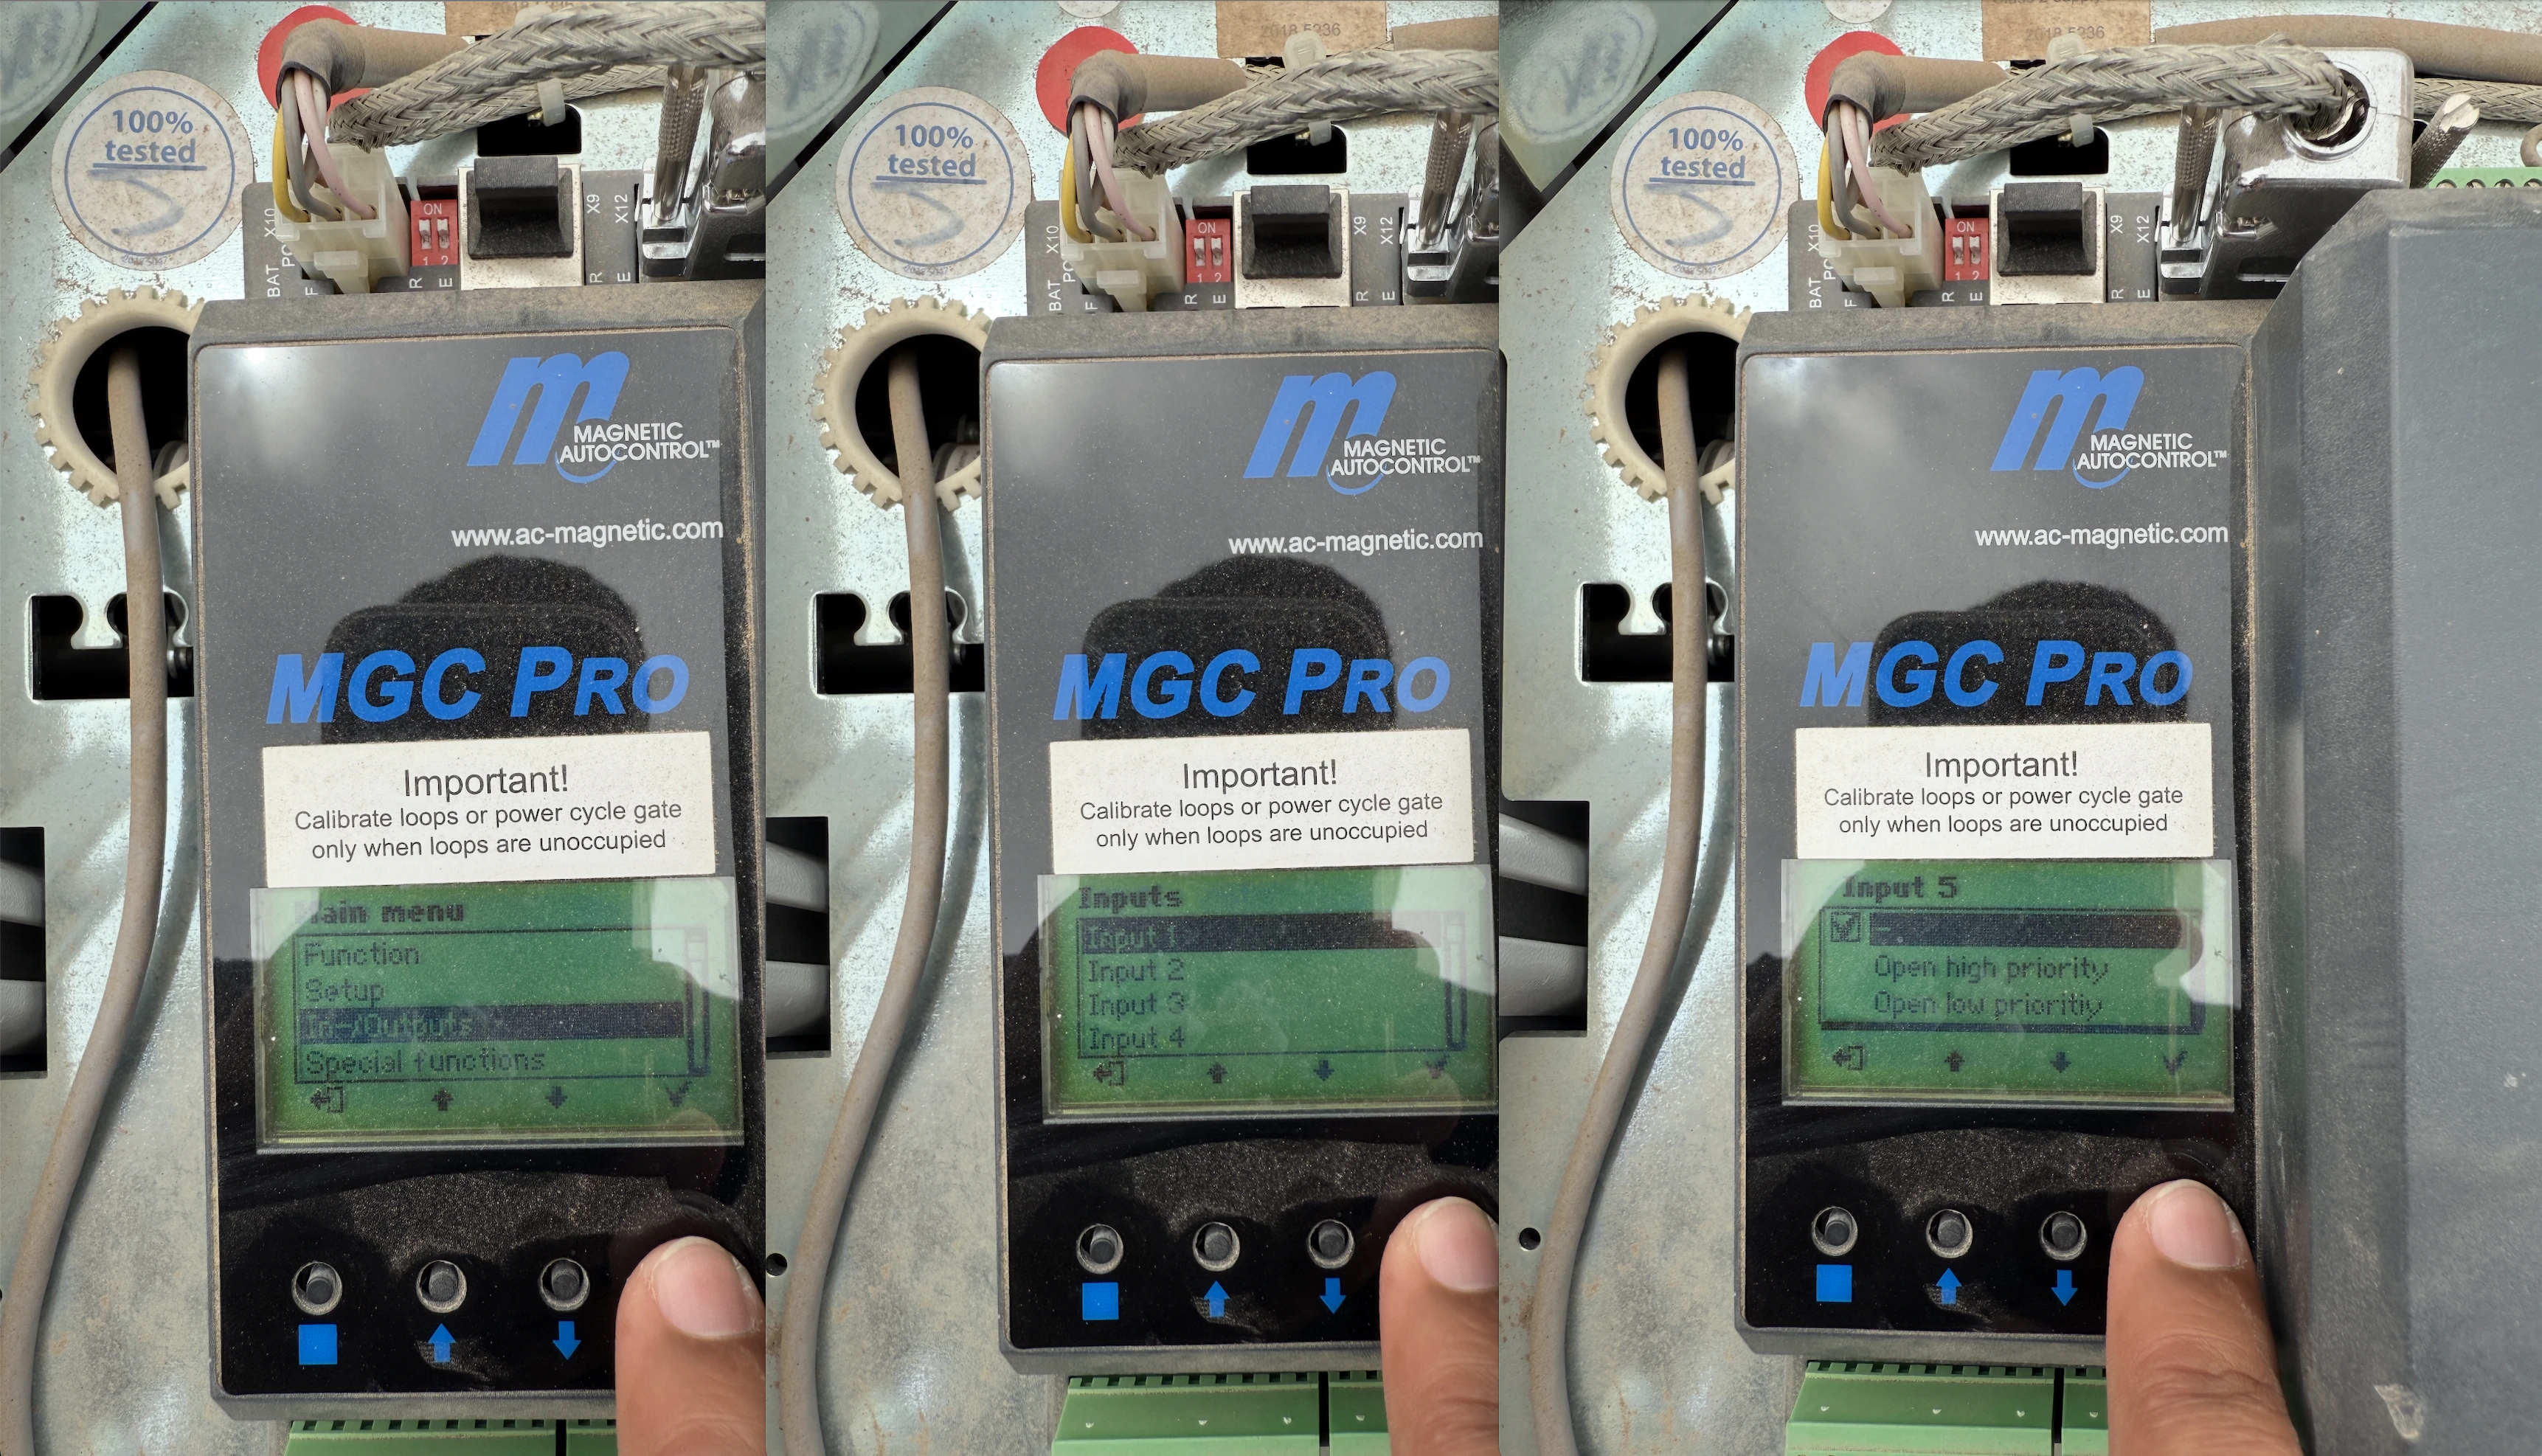
If any inputs have 'Ext opening loop exit' set it will likely cause issues
with programming mode 7. If any input has that setting already it needs to be
cleared (set to '-')
To set the Input values:
1. Press the circle button below the screen to open the main menu.
2. Select In-/Outputs
3. Go through each Input and check the value
## Network Configuration
1. Press the circle button below the screen to open the main menu.
2. Select the "Ethernet" option.
3. Select "Network Settings".
4. Make sure that DHCP is enabled.
5. Power cycle the gate.
6. Repeat the steps and go back to "Network Settings".
7. Make sure that the IP address starts with 172.162.184.X as it is shown in the image below:
## Static IP Address
Some Magnetic gates do not support DHCP, even though the setting is present in the menu. DHCP remains our preferred method, but we can assign a static IP address when necessary. This procedure requires on-prem technical expertise.
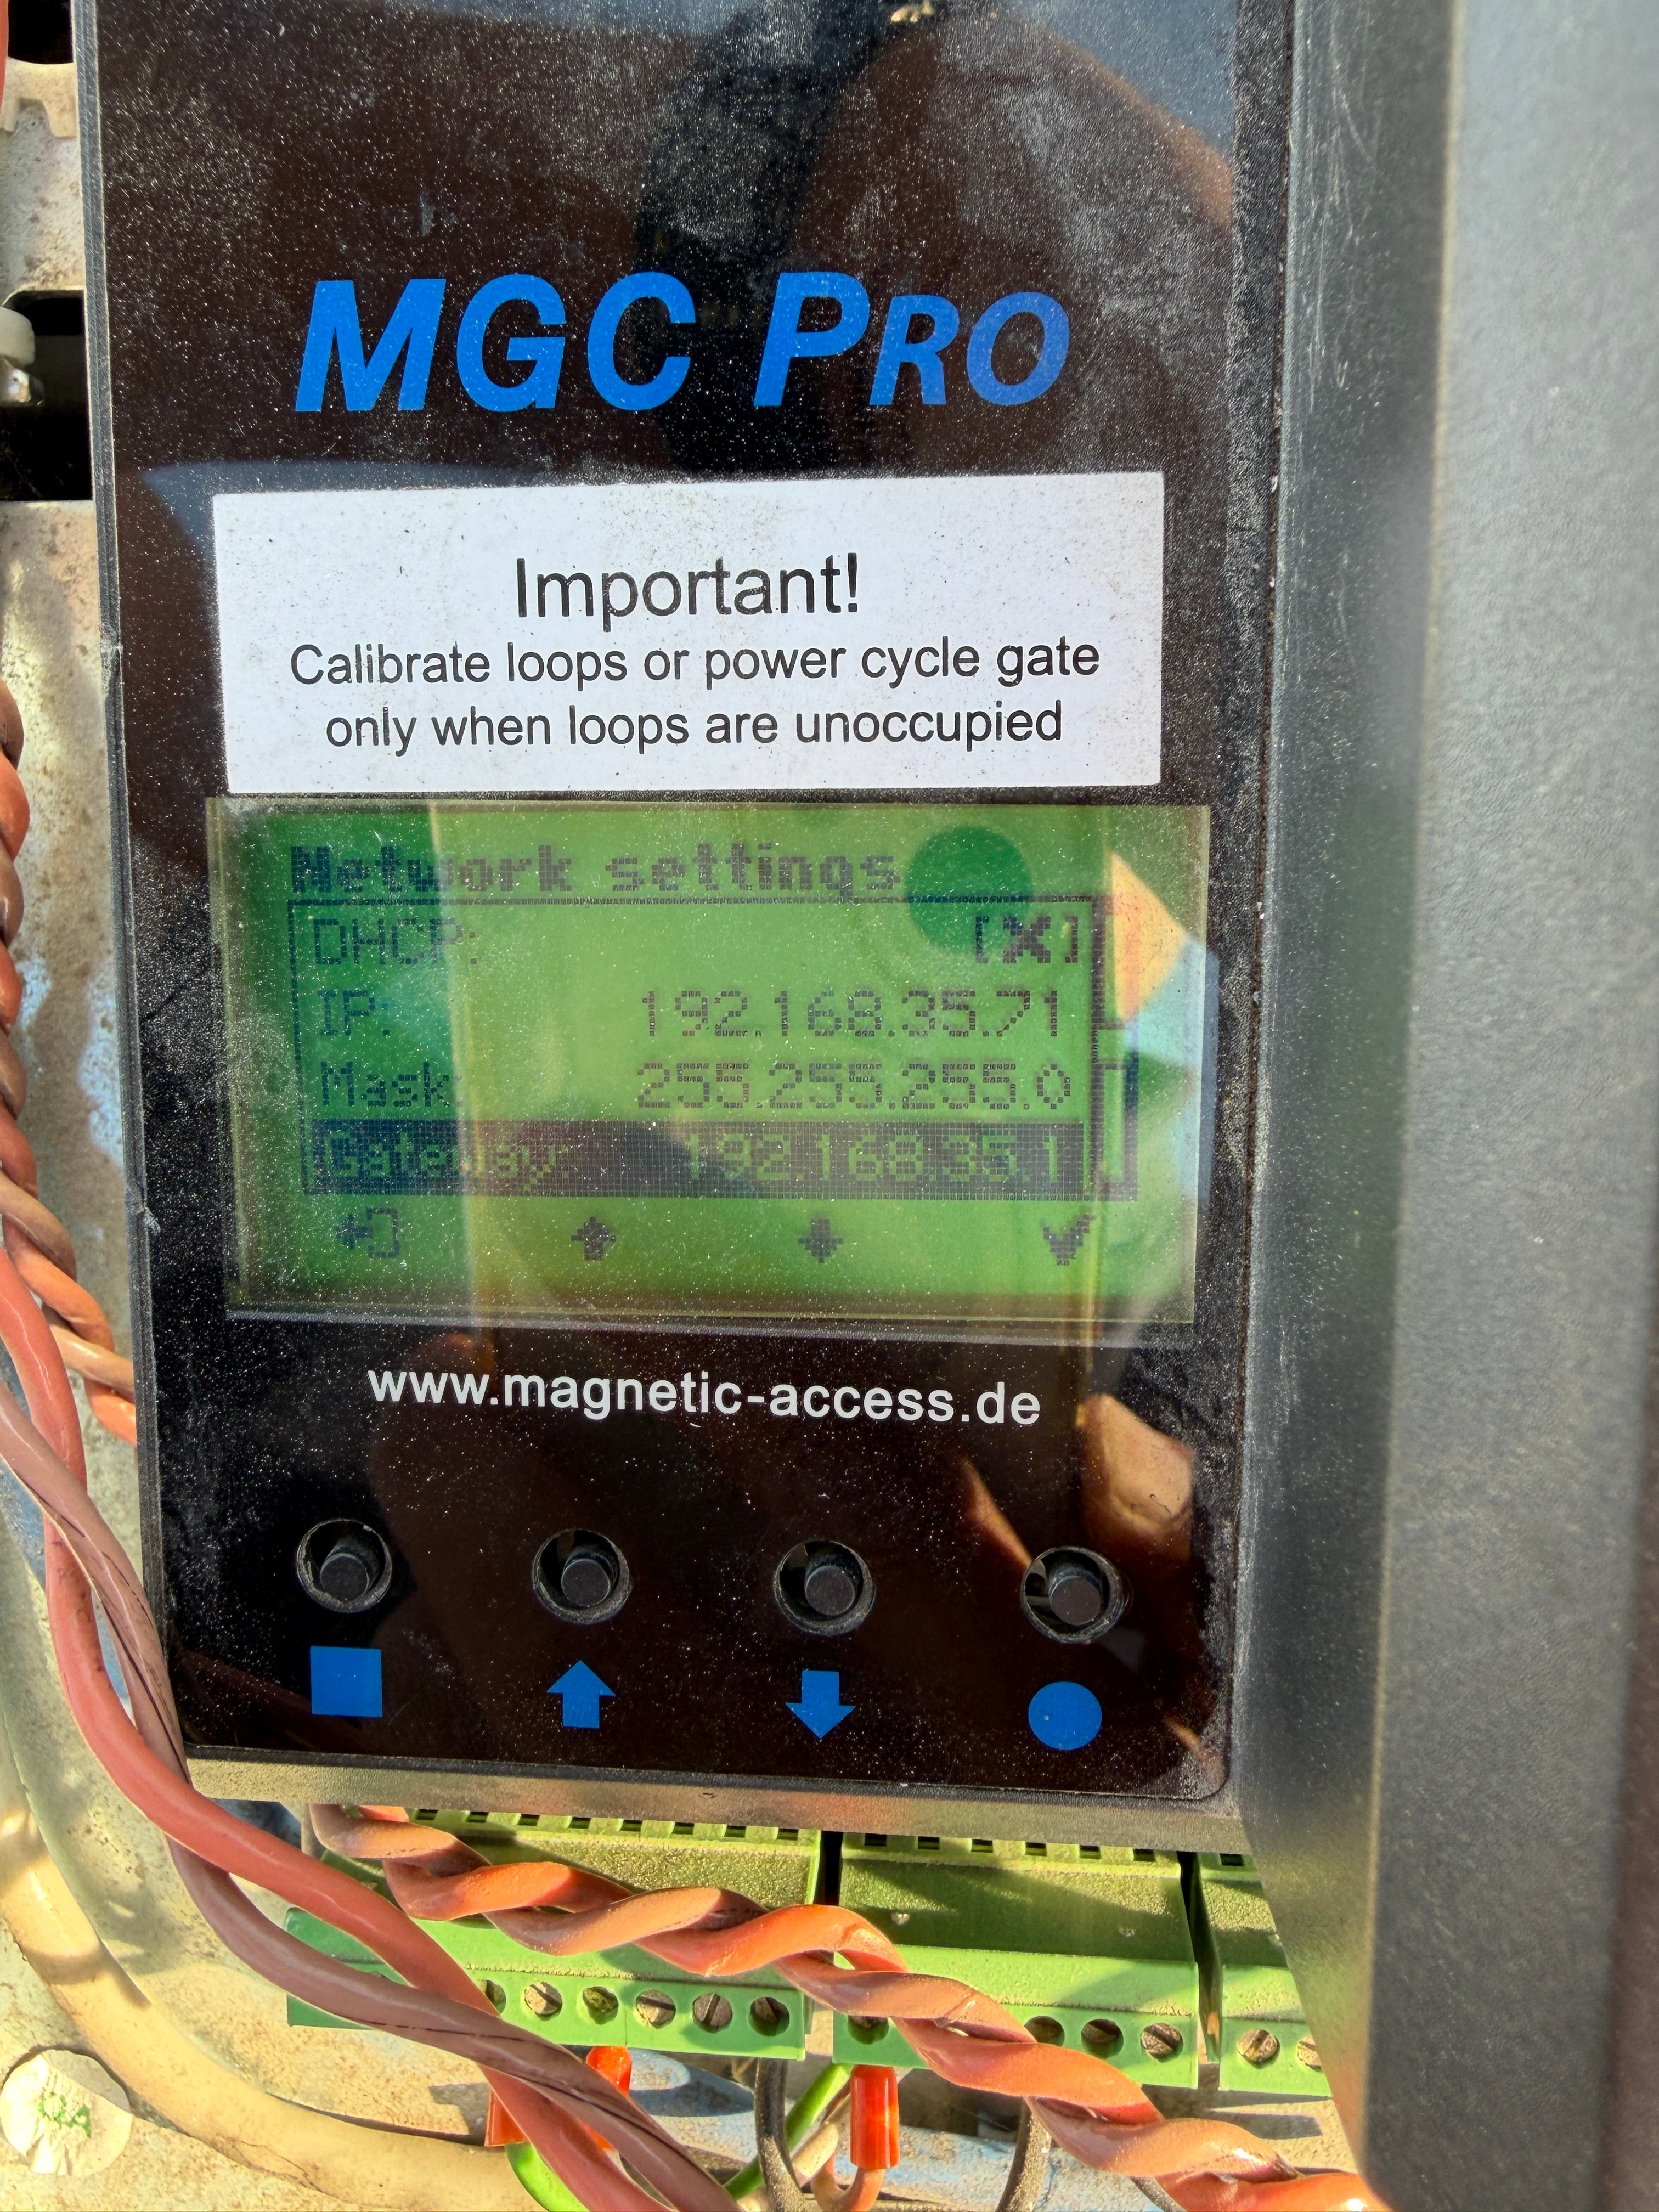
Open the main menu on the gate's digital display and go to "Settings > Ethernet > Network Settings". Record the IP address shown. In this example the gate is at `192.168.35.71`.
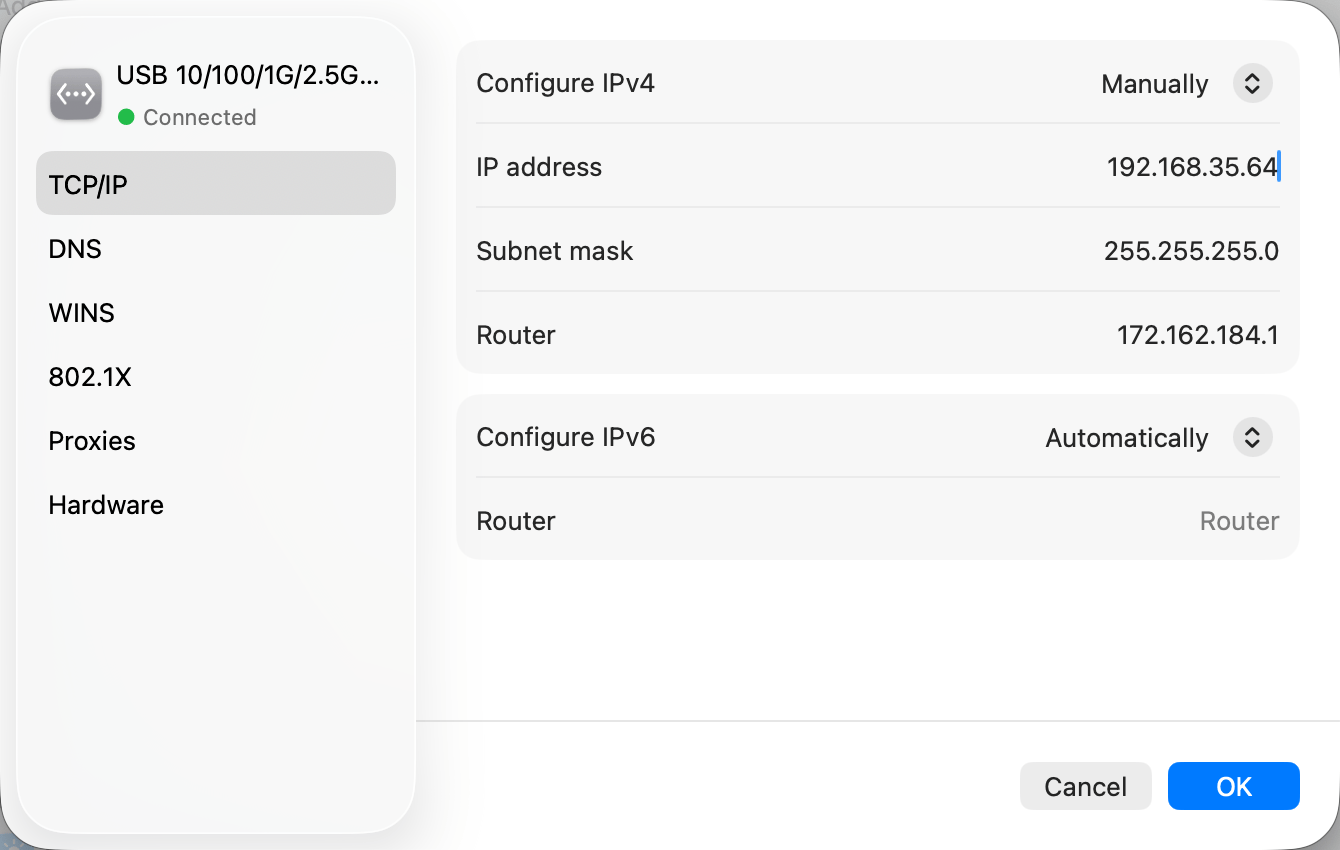
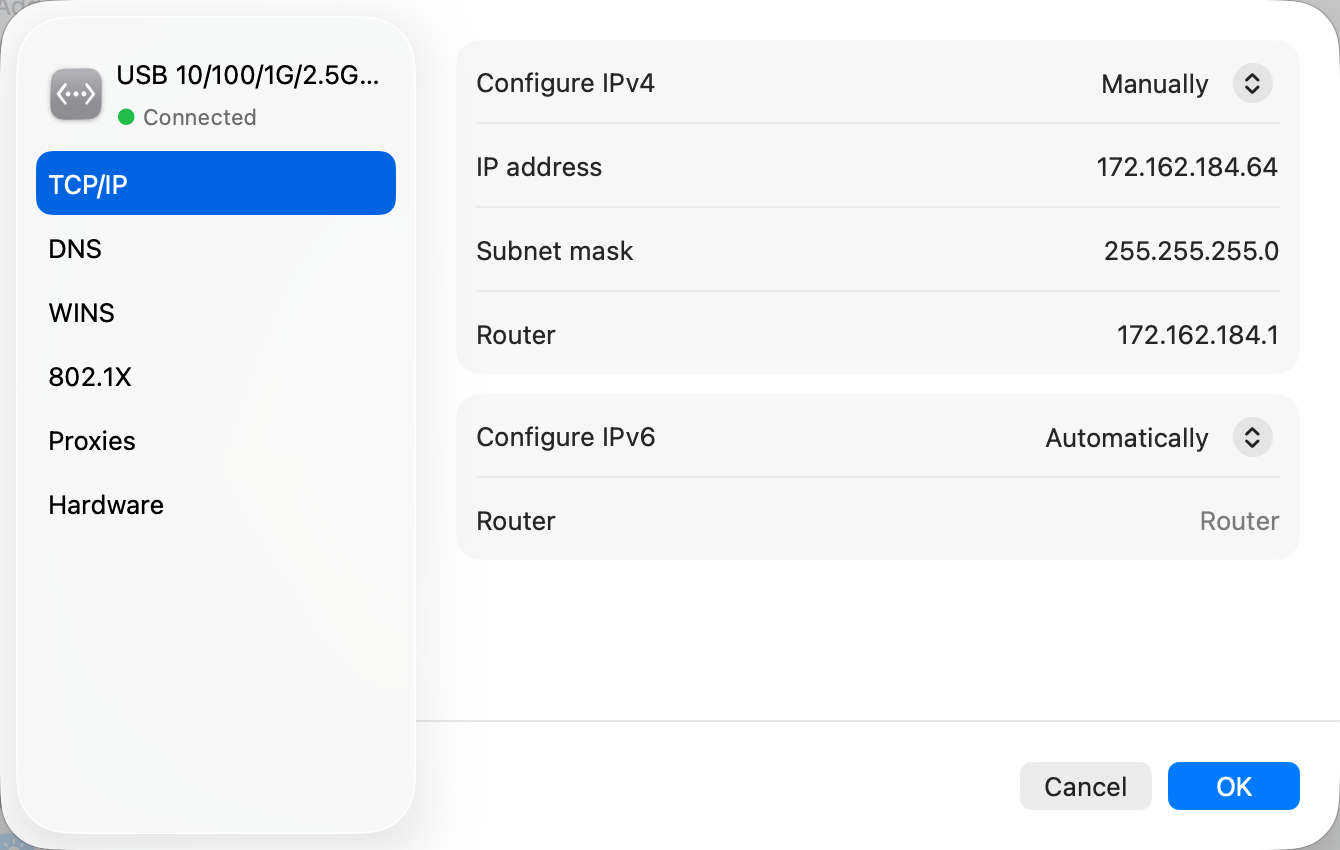
Plug a laptop into the gate's ethernet module. Set that ethernet interface to configure IPv4 manually and choose an address in the same subnet as the gate, but not identical to it. In this example the laptop uses `192.168.35.64`.
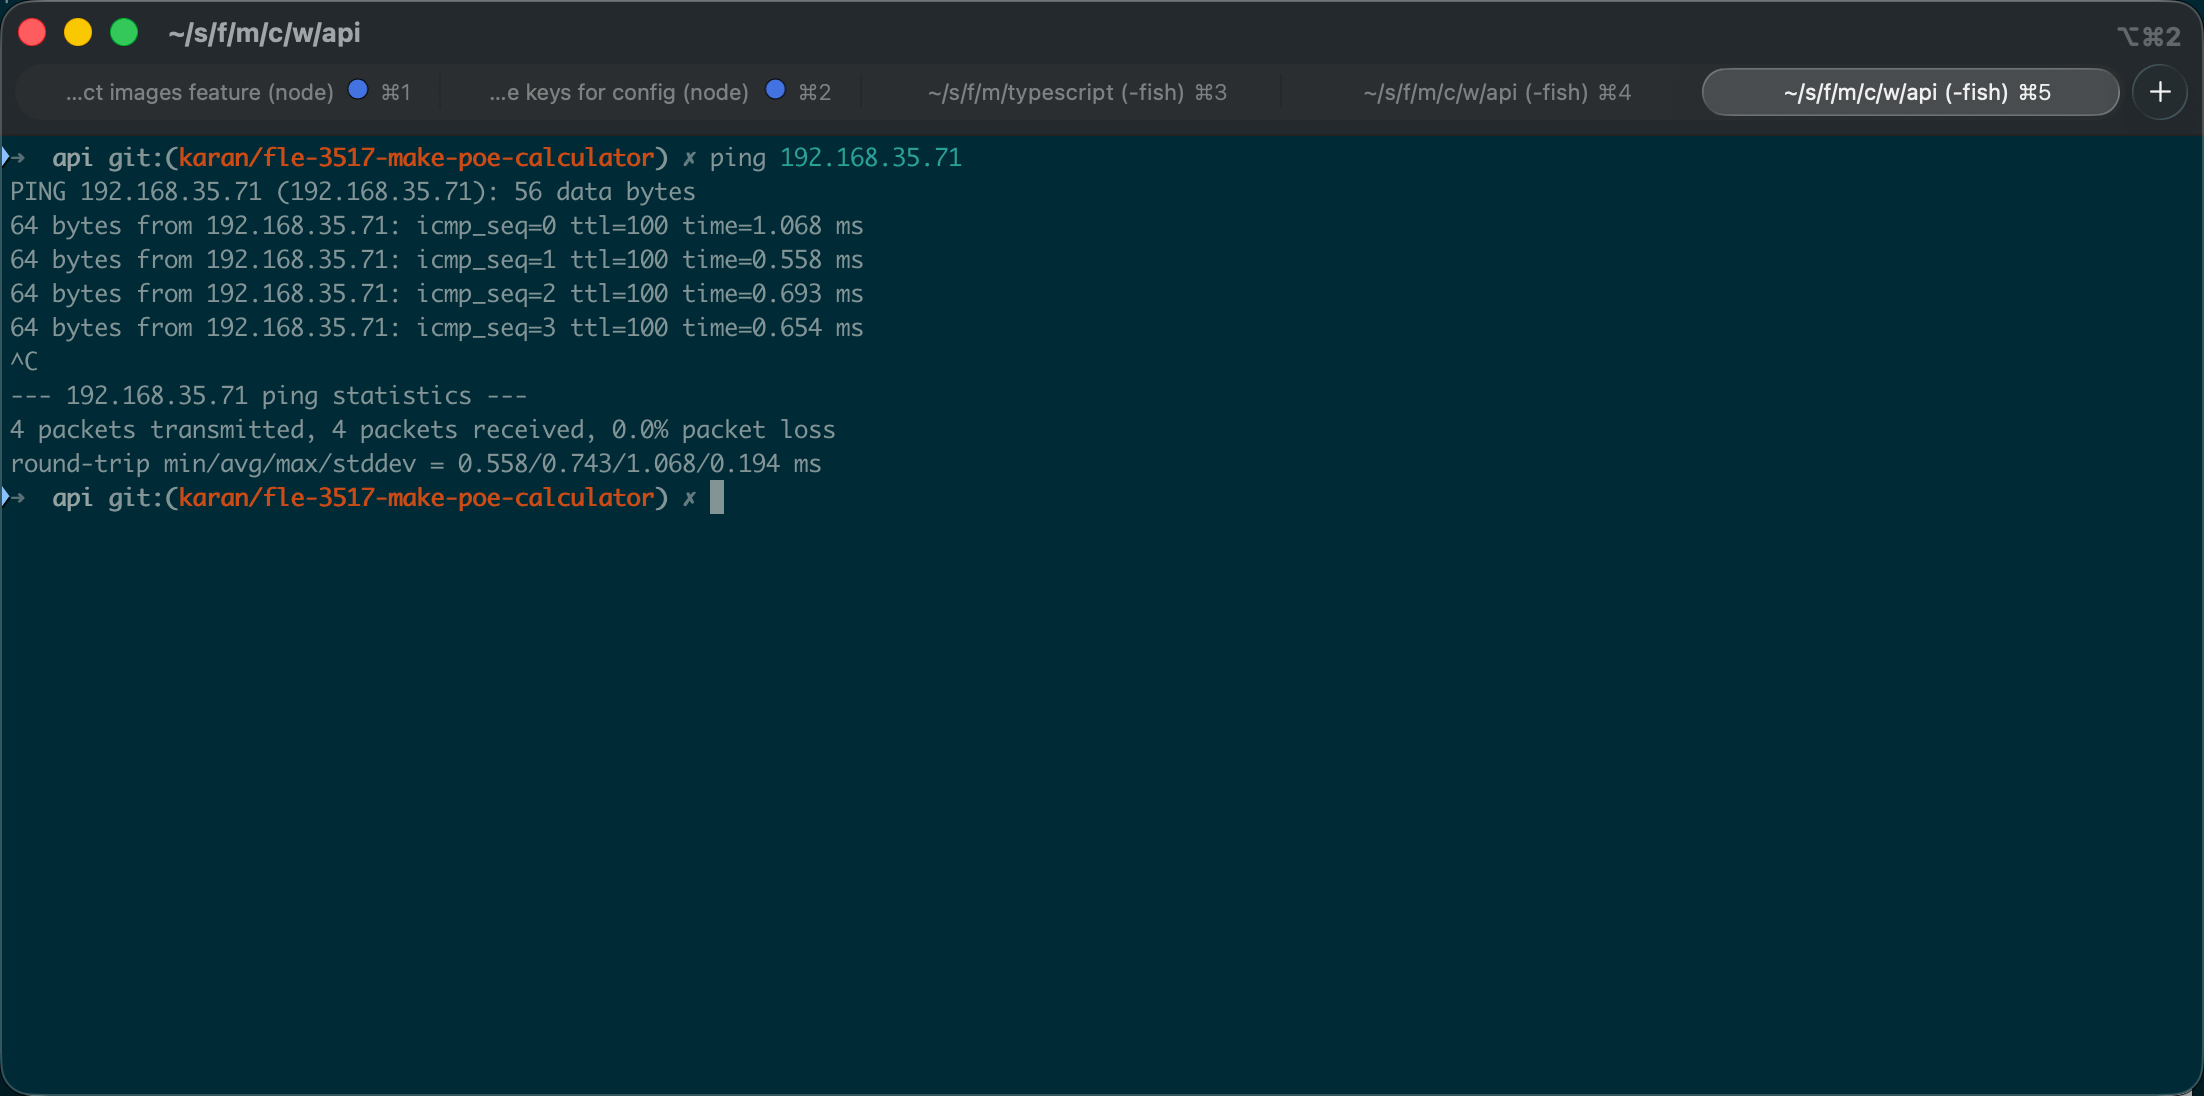
Ping the gate's current IP address. Let the test run for a few seconds, then stop it and confirm 0% packet loss.
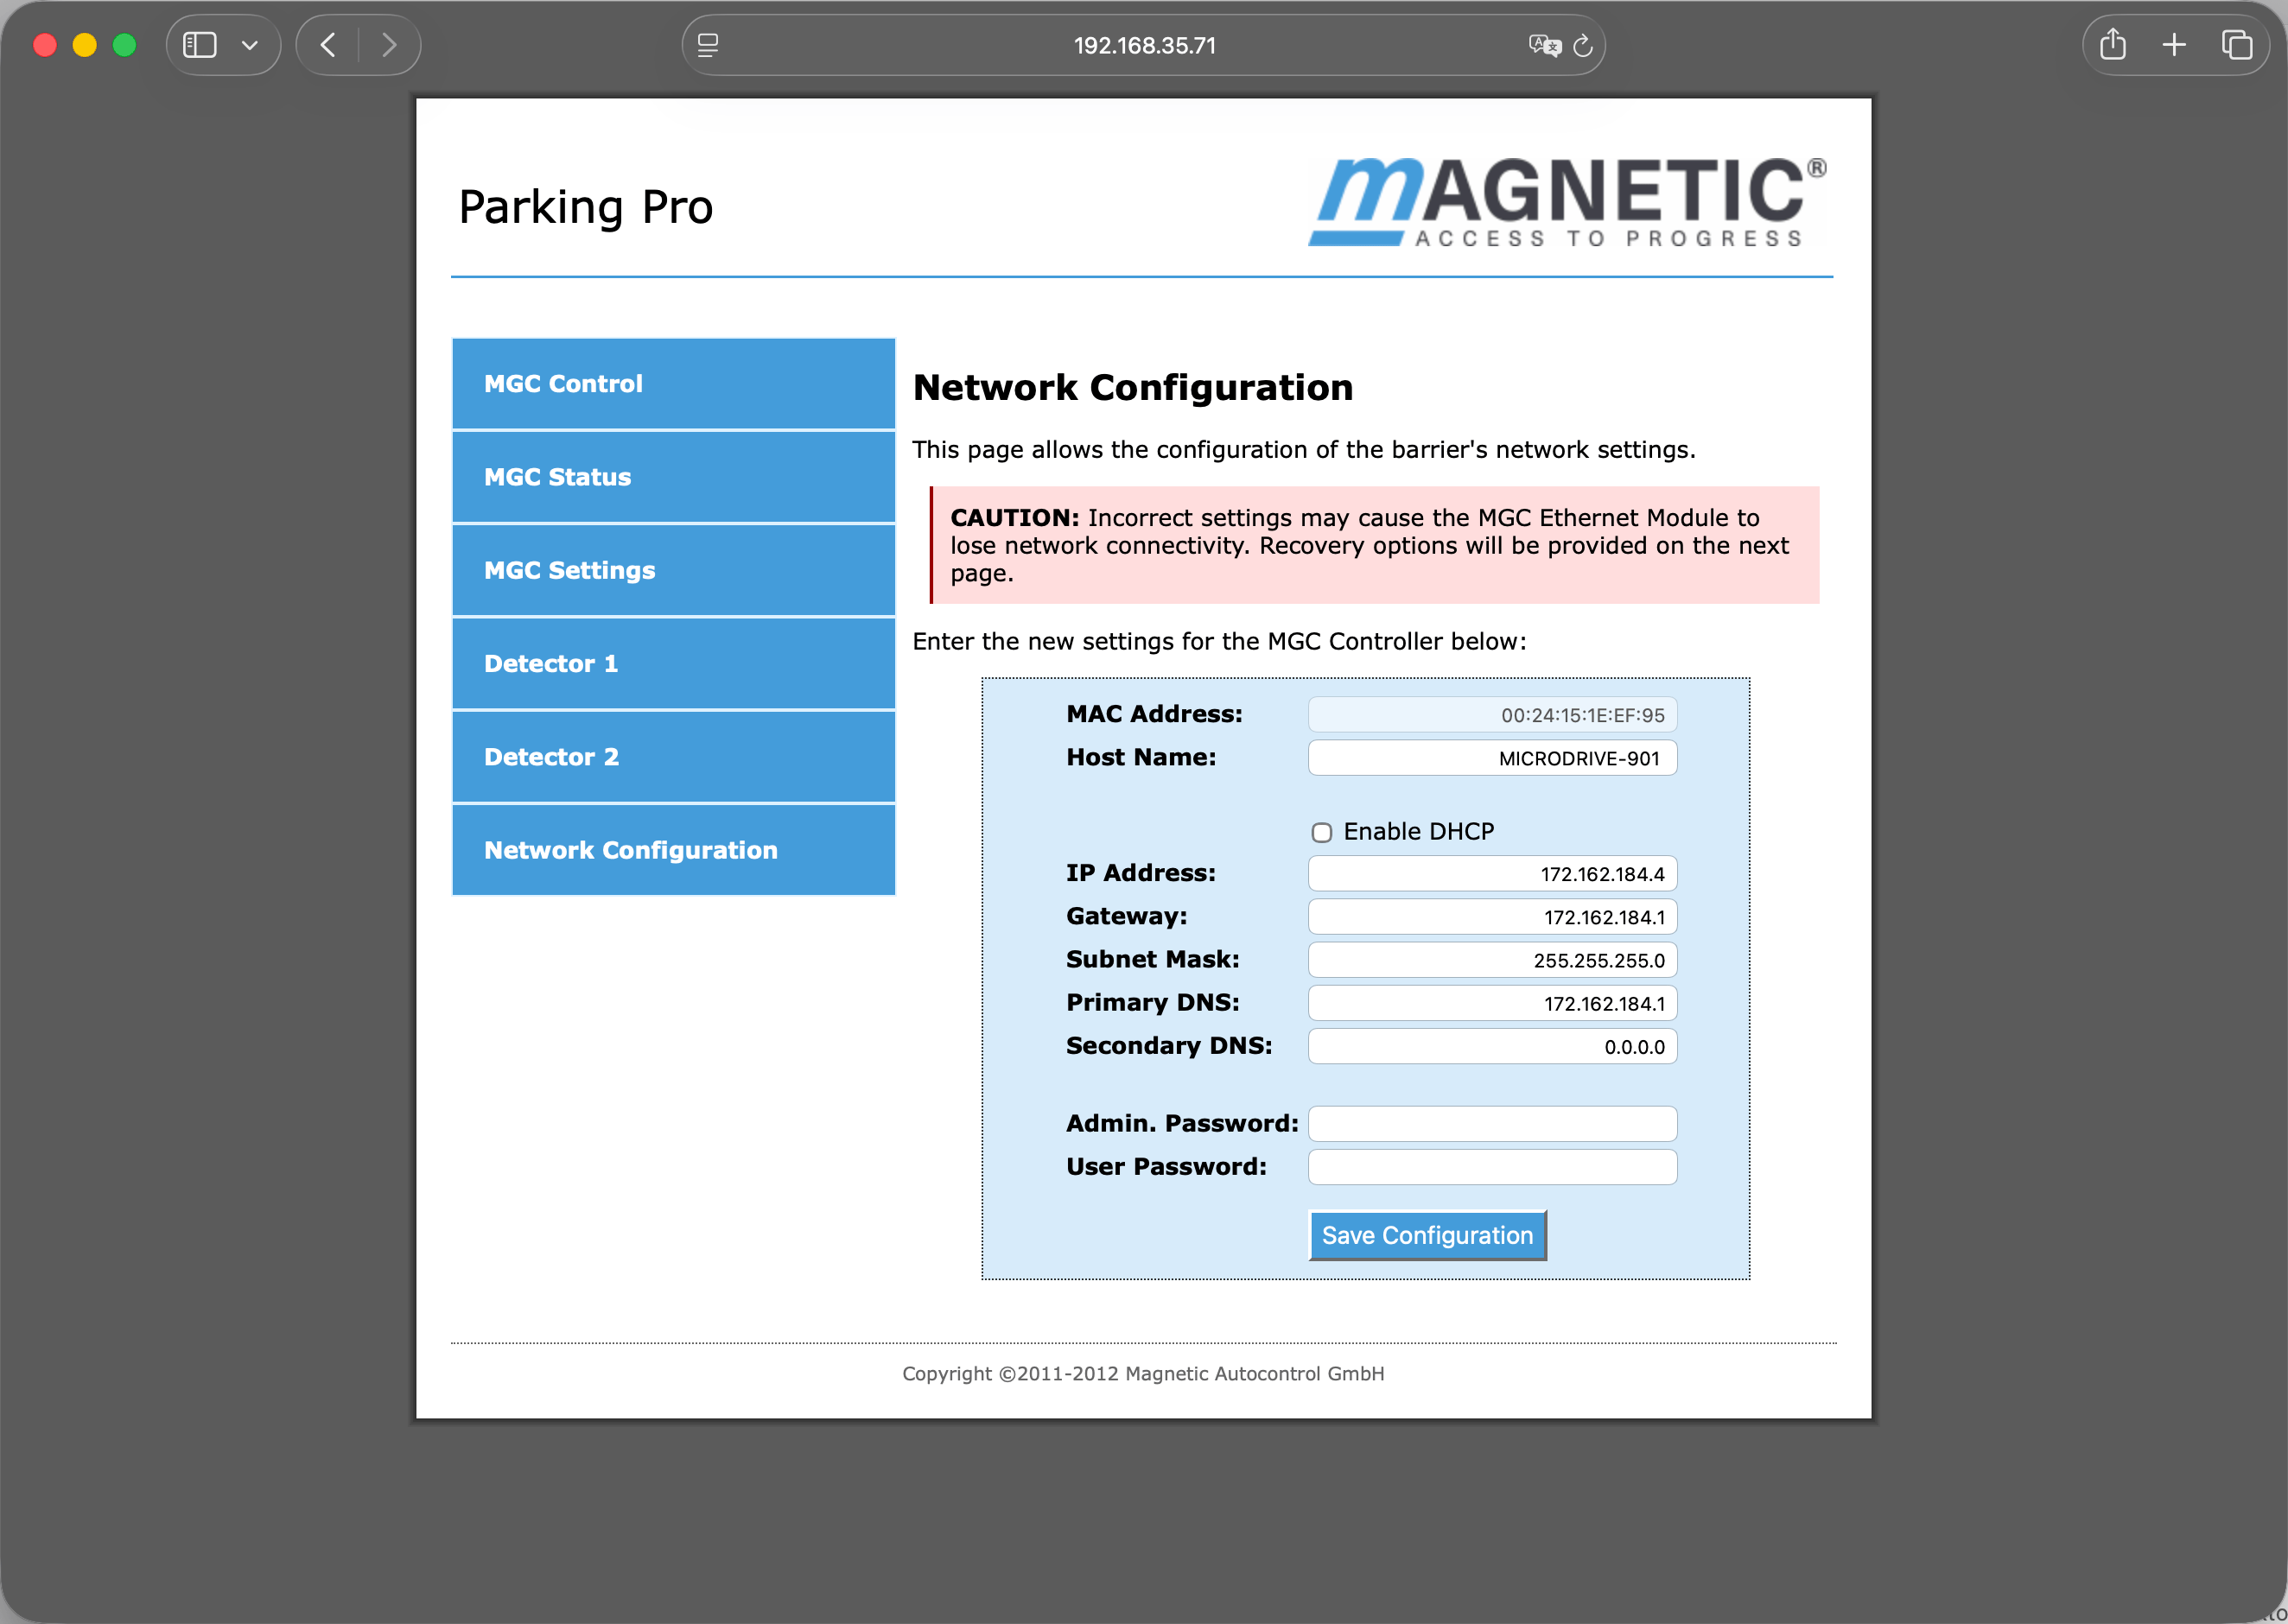
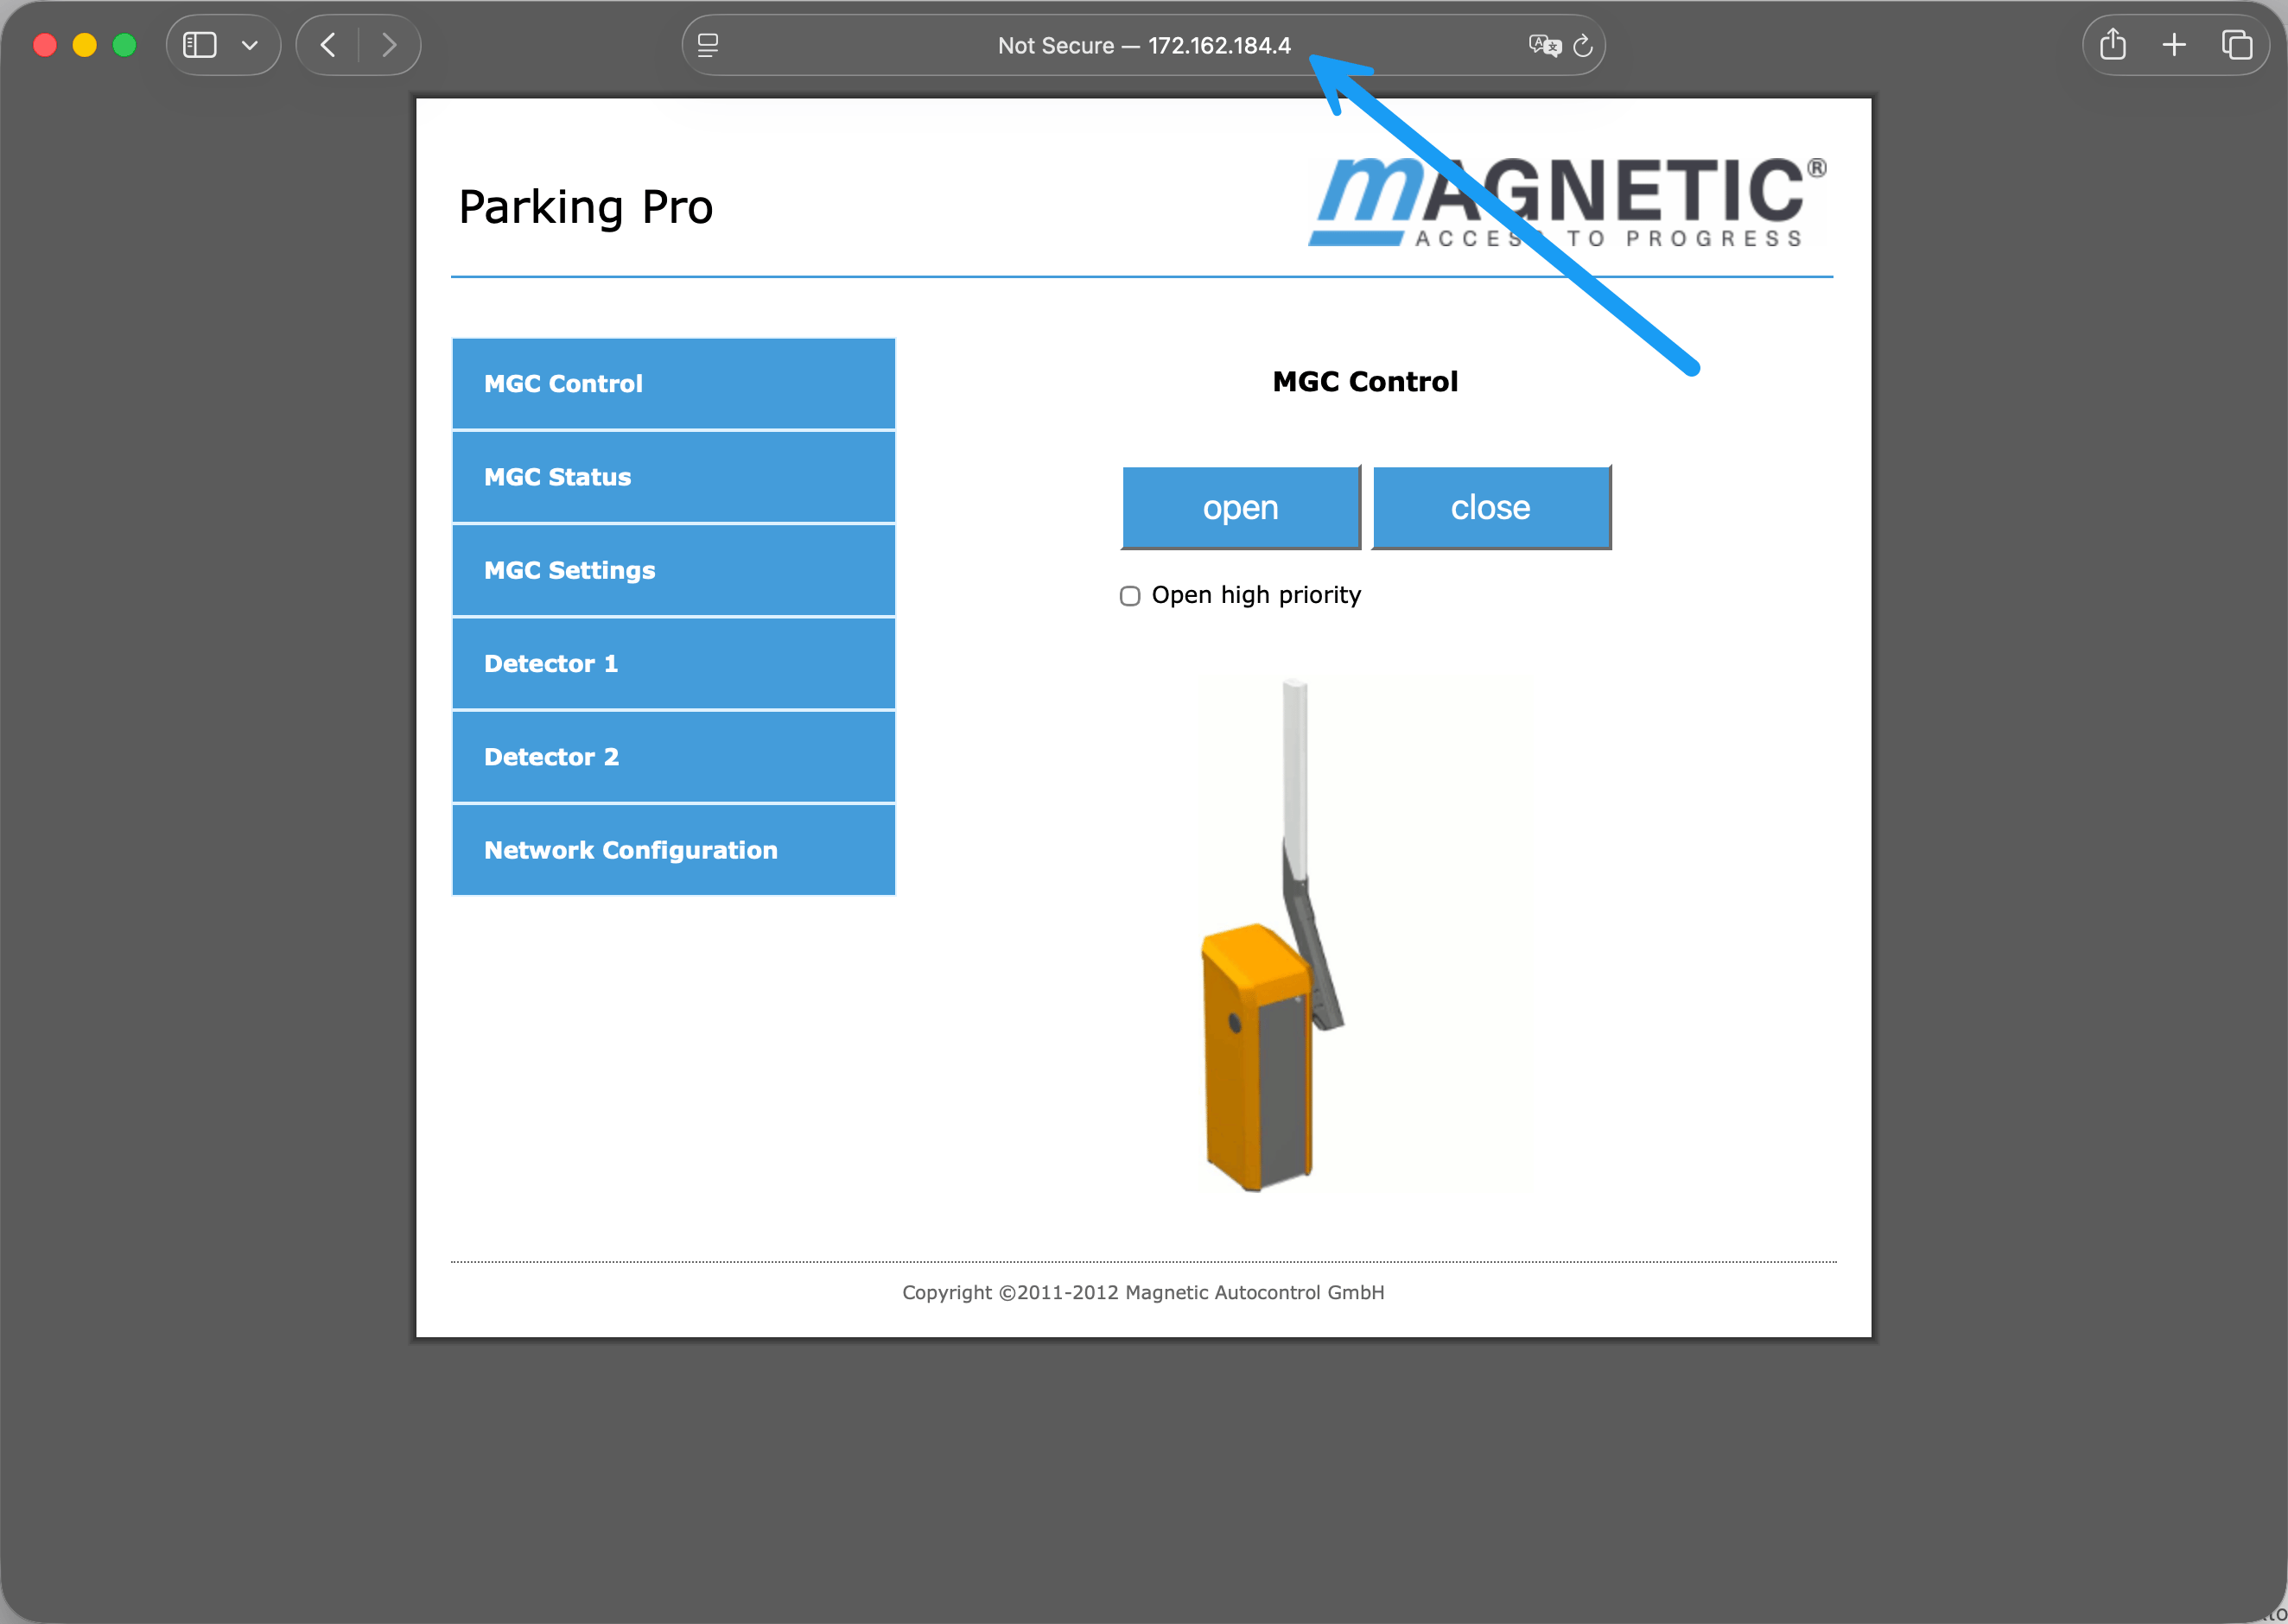
In a web browser, navigate to the gate's current IP address over `http` (not `https`). Select "Network Configuration" and enter the new values. The exact IP address depends on the lane, so confirm it with FlexWash support before saving.
Take a photo of these settings before saving them. Incorrect values will
cut off network access to the gate.
Update the laptop's ethernet settings to match the new FlexWash subnet.
The gate can take up to 5 minutes to apply the change and reboot. Once it finishes, the web interface loads on the new static IP address.
## Ethernet Module
The Ethernet cable from the FlexWash Switch should be plugged into the Ethernet module on the right side of the gate, as shown in the image above.
If your gate does not have an ethernet module, you will need to purchase one.
We recommend ordering directly from the
[manufacturer](https://magneticgateopeners.com/store/ethernet-pro-select-mmd-em01.html).
Avoid connecting any cables to the motor port.
## Opening and closing the gate manually
1. Switch the "Service" switch for the "Service" mode. The LED lights red. The display backlighting flashes.
2. Perform one of the following functions:
* Push middle left button : Manually open the barrier.
* Push middle right button : Manually close the barrier.
1. Switch "Service" switch. The LED must light green.
## Turning the gates on and off
1. Remove the barrier housing door.
2. Switch on the barrier via the double pole mains switch.
3. Depending on the settings in the "Start-up behaviour" menu, the barrier arm slowly moves into the top end position or stops.
4. Mount the door.
5. Attach and lock the hood.
## Closing or opening the gate's arm in case of power failure
In case of power failure, the gate's arm may be in the lower or upper dead point. For example, the gate's arm can no longer be easily moved manually. In this case, proceed as follows:
1. Remove the barrier housing hood.
2. Remove the barrier housing door.
3. Press a tool straight into appropriate tool bore. The lever arm is pressed from the dead point.
4. Mount the door if applicable.
5. Attach and lock the hood if applicable.
 The first thing you want to do is remove the top lid of the gate and check if the screen is on. If the screen is off, that indicates that the gate is turned off or not receiving any power, in which case the next step would be to check on the power switch.\
\
If the screen is on, you should follow these steps:
1. Test the gate by opening it manually.
2. If the gate moves:
3. Check the programming mode.
4. Check if there is an error icon
The first thing you want to do is remove the top lid of the gate and check if the screen is on. If the screen is off, that indicates that the gate is turned off or not receiving any power, in which case the next step would be to check on the power switch.\
\
If the screen is on, you should follow these steps:
1. Test the gate by opening it manually.
2. If the gate moves:
3. Check the programming mode.
4. Check if there is an error icon  On the left side of the screen you should see the number 7. Any other number indicates that the gates are not in the correct programming mode.
To set the correct programming mode:
1. Press the circle button below the screen to open the main menu.
2. Select the “Function” option.
On the left side of the screen you should see the number 7. Any other number indicates that the gates are not in the correct programming mode.
To set the correct programming mode:
1. Press the circle button below the screen to open the main menu.
2. Select the “Function” option.
 1. Set the programming mode to 7.
2. Save the change by pressing the circle button again.
1. Set the programming mode to 7.
2. Save the change by pressing the circle button again.
 ## Network Configuration
1. Press the circle button below the screen to open the main menu.
2. Select the "Ethernet" option.
3. Select "Network Settings".
4. Make sure that DHCP is enabled.
5. Power cycle the gate.
6. Repeat the steps and go back to "Network Settings".
7. Make sure that the IP address starts with 172.162.184.X as it is shown in the image below:
## Network Configuration
1. Press the circle button below the screen to open the main menu.
2. Select the "Ethernet" option.
3. Select "Network Settings".
4. Make sure that DHCP is enabled.
5. Power cycle the gate.
6. Repeat the steps and go back to "Network Settings".
7. Make sure that the IP address starts with 172.162.184.X as it is shown in the image below:
 ## Static IP Address
Some Magnetic gates do not support DHCP, even though the setting is present in the menu. DHCP remains our preferred method, but we can assign a static IP address when necessary. This procedure requires on-prem technical expertise.
## Static IP Address
Some Magnetic gates do not support DHCP, even though the setting is present in the menu. DHCP remains our preferred method, but we can assign a static IP address when necessary. This procedure requires on-prem technical expertise.
 The Ethernet cable from the FlexWash Switch should be plugged into the Ethernet module on the right side of the gate, as shown in the image above.
 ## Opening and closing the gate manually
 1. Switch the "Service" switch for the "Service" mode. The LED lights red. The display backlighting flashes.
2. Perform one of the following functions:
* Push middle left button : Manually open the barrier.
* Push middle right button : Manually close the barrier.
1. Switch "Service" switch. The LED must light green.
## Turning the gates on and off
1. Remove the barrier housing door.
2. Switch on the barrier via the double pole mains switch.
3. Depending on the settings in the "Start-up behaviour" menu, the barrier arm slowly moves into the top end position or stops.
4. Mount the door.
5. Attach and lock the hood.
1. Switch the "Service" switch for the "Service" mode. The LED lights red. The display backlighting flashes.
2. Perform one of the following functions:
* Push middle left button : Manually open the barrier.
* Push middle right button : Manually close the barrier.
1. Switch "Service" switch. The LED must light green.
## Turning the gates on and off
1. Remove the barrier housing door.
2. Switch on the barrier via the double pole mains switch.
3. Depending on the settings in the "Start-up behaviour" menu, the barrier arm slowly moves into the top end position or stops.
4. Mount the door.
5. Attach and lock the hood.
 ## Closing or opening the gate's arm in case of power failure
 In case of power failure, the gate's arm may be in the lower or upper dead point. For example, the gate's arm can no longer be easily moved manually. In this case, proceed as follows:
1. Remove the barrier housing hood.
2. Remove the barrier housing door.
3. Press a tool straight into appropriate tool bore. The lever arm is pressed from the dead point.
4. Mount the door if applicable.
5. Attach and lock the hood if applicable.
In case of power failure, the gate's arm may be in the lower or upper dead point. For example, the gate's arm can no longer be easily moved manually. In this case, proceed as follows:
1. Remove the barrier housing hood.
2. Remove the barrier housing door.
3. Press a tool straight into appropriate tool bore. The lever arm is pressed from the dead point.
4. Mount the door if applicable.
5. Attach and lock the hood if applicable.