> ## Documentation Index
> Fetch the complete documentation index at: https://docs.flexwash.com/llms.txt
> Use this file to discover all available pages before exploring further.
# RFID Reader
> Mount, aim, and calibrate the RFID reader so the gate opens for the first vehicle in line, every time.
 When processing members, the RFID reader identifies the vehicle at the
head of the queue which triggers the gate. Aiming and calibration decides whether
a member drives through without stopping, sits at a closed gate, or watches the gate open for the car behind.
RFID is the better choice than [LPR](/getting-started/equipment-installation/lpr-installation) wherever a plate is hard to read reliably: privacy
or tinted covers, vanity plates with unusual or ambiguous character sets such as 0 and O or 8 and B, and plates obscured by mud,
road salt, or snow.
## Read Zone
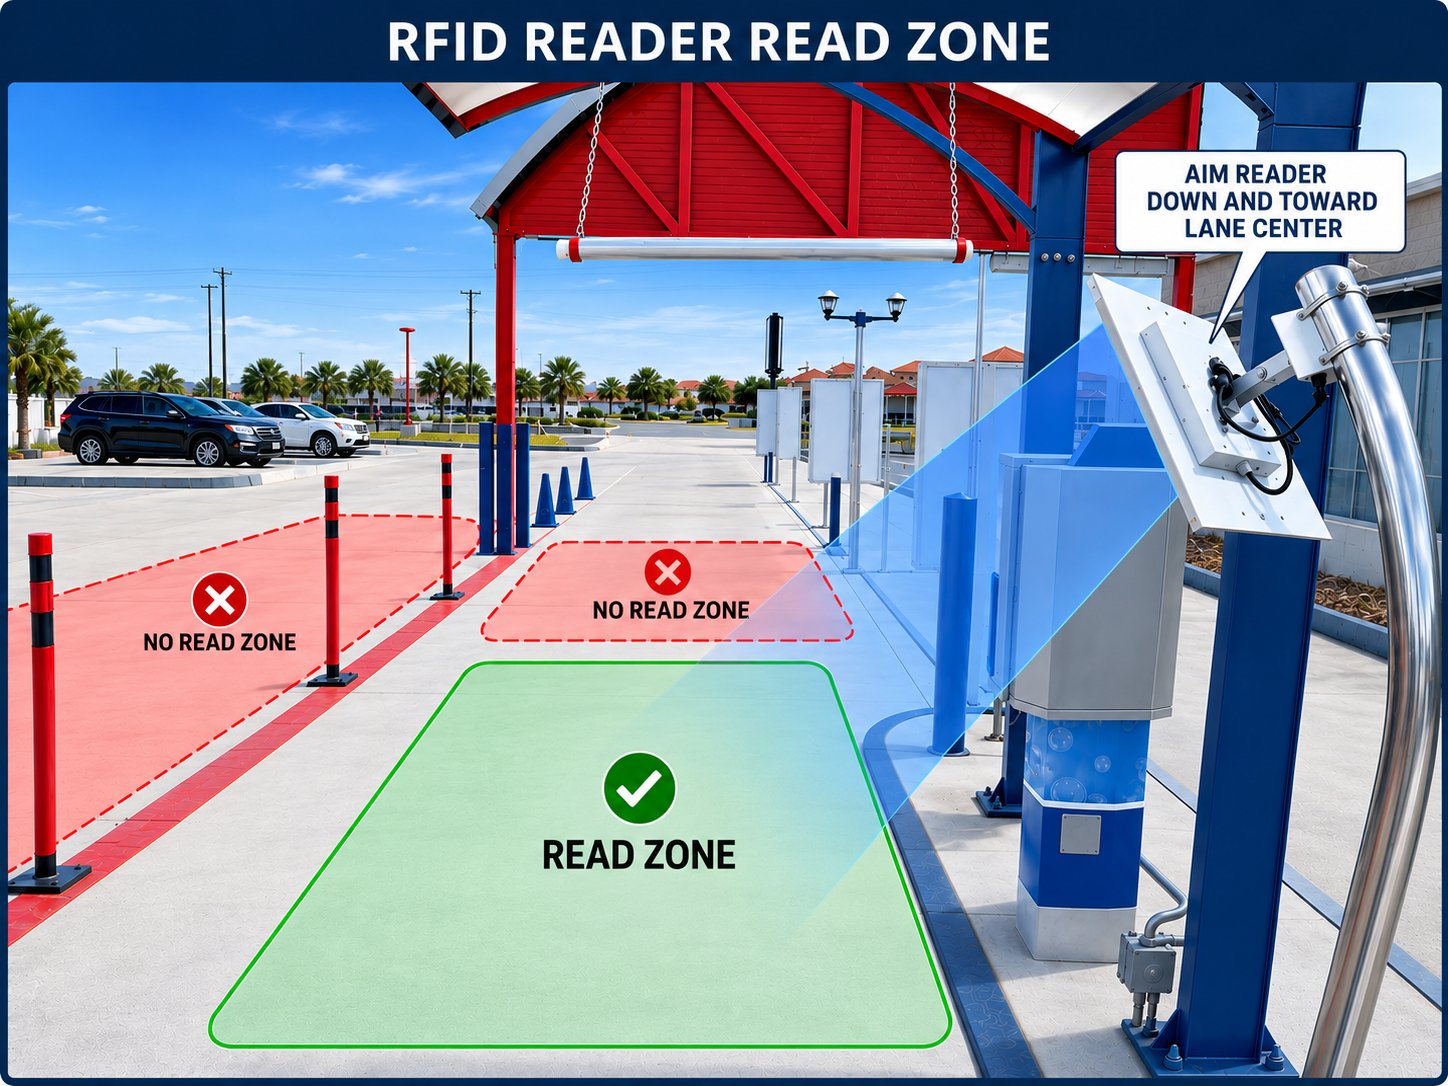
The RFID reader emits a directional beam of radio energy, typically referred
to as the **read zone**. A tag is detected only when it sits inside
this zone with enough signal strength to be picked up.
### What to Avoid
* Bad aiming and calibration can cause the reader to detect the **second vehicle
in line**, behind the lead car, opening the gate for the wrong member.
* **Drive-by traffic** in adjacent lanes, parking areas, or the street. A stray
read of a member tag opens the gate unnecessarily, inflates the car count, and
confuses the queue.
## Mounting and Aim
There are two mounting approaches that reliably contain the read zone to the lead vehicle.
### Side Mount, Angled Down and Inward
Mount the reader on a post or pole beside the lane, at roughly windshield
height. Aim the antenna **down and toward the center of the lane**, so the beam
meets the pavement just in front of the gate.
This is the most common installation. The downward tilt prevents the beam from
reaching the next car in line. The inward angle keeps it off adjacent traffic.
### Overhead Mount, Pointing Straight Down
Mount the reader on a canopy or arch directly above the stop position, with
the antenna pointing **straight down**. The read zone forms a tight footprint
on the pavement directly under the antenna.
Overhead mounting is the cleanest option when the site has existing structure
to support it.
Aimed too high or too far out, the beam reaches the next car in line or the
adjacent lane.
### Tag Placement
Mount the tag on the inside of the windshield, usually in the bottom driver-side
corner. Some makes and models need a different position because of thicker glass
or RFID-blocking coatings. Windshield glass and body metal both weaken the
signal, so where the tag sits changes how it reads.
Always test with the tag mounted on an actual vehicle. A tag held in open air
or walked through the lane reads far stronger than the same tag behind glass,
and any tuning done against it will not hold up with real traffic.
## Network
Our RFID readers are PoE (Power over Ethernet). A single CAT5E cable carries
both power and data, so the only wire you run to the mounting location is the
CAT5E. There is no need for a separate power circuit or outlet at the reader.
Terminate the CAT5E at a PoE switch or PoE injector on the network side.
The unit ships with black and red leads for non-PoE power. On a PoE install
these leads are unused. Remove them during installation so they are never
mistaken for a required connection.
## RFID Calibration
Calibration sets how strong a tag's signal has to be before the lane accepts
it, which is what stops the reader picking up the car behind or the lane next
door.
Two levers control what a lane reads. The **physical aim** of the unit sets
where it looks; the **slider** sets how sensitive it is. Confirm the aim first,
then use the slider to fine-tune. A slider cannot correct a beam pointed at the
wrong place.
### Signal Strength and RSSI Thresholds
Signal strength appears in dBm, and the values are negative, so closer to zero
is stronger. A -35 read is much stronger than a -60 read, and a tag reads
stronger the closer it sits to the antenna.
Each reader has a **threshold**, the weakest read it will accept. The
coordinator discards anything below it, so a weak read never opens a gate and
never appears in the table.
The slider sets that threshold, anywhere from -80 to 0.
* **Toward -80**, the lane accepts weaker, more distant reads, which widens the
read zone. Go this way when valid member tags get missed within the read zone.
* **Toward 0**, the lane accepts only strong, close-up reads, which tightens the
read zone. Go this way when the reader picks up the car behind or the adjacent lane.
### Opening the Page
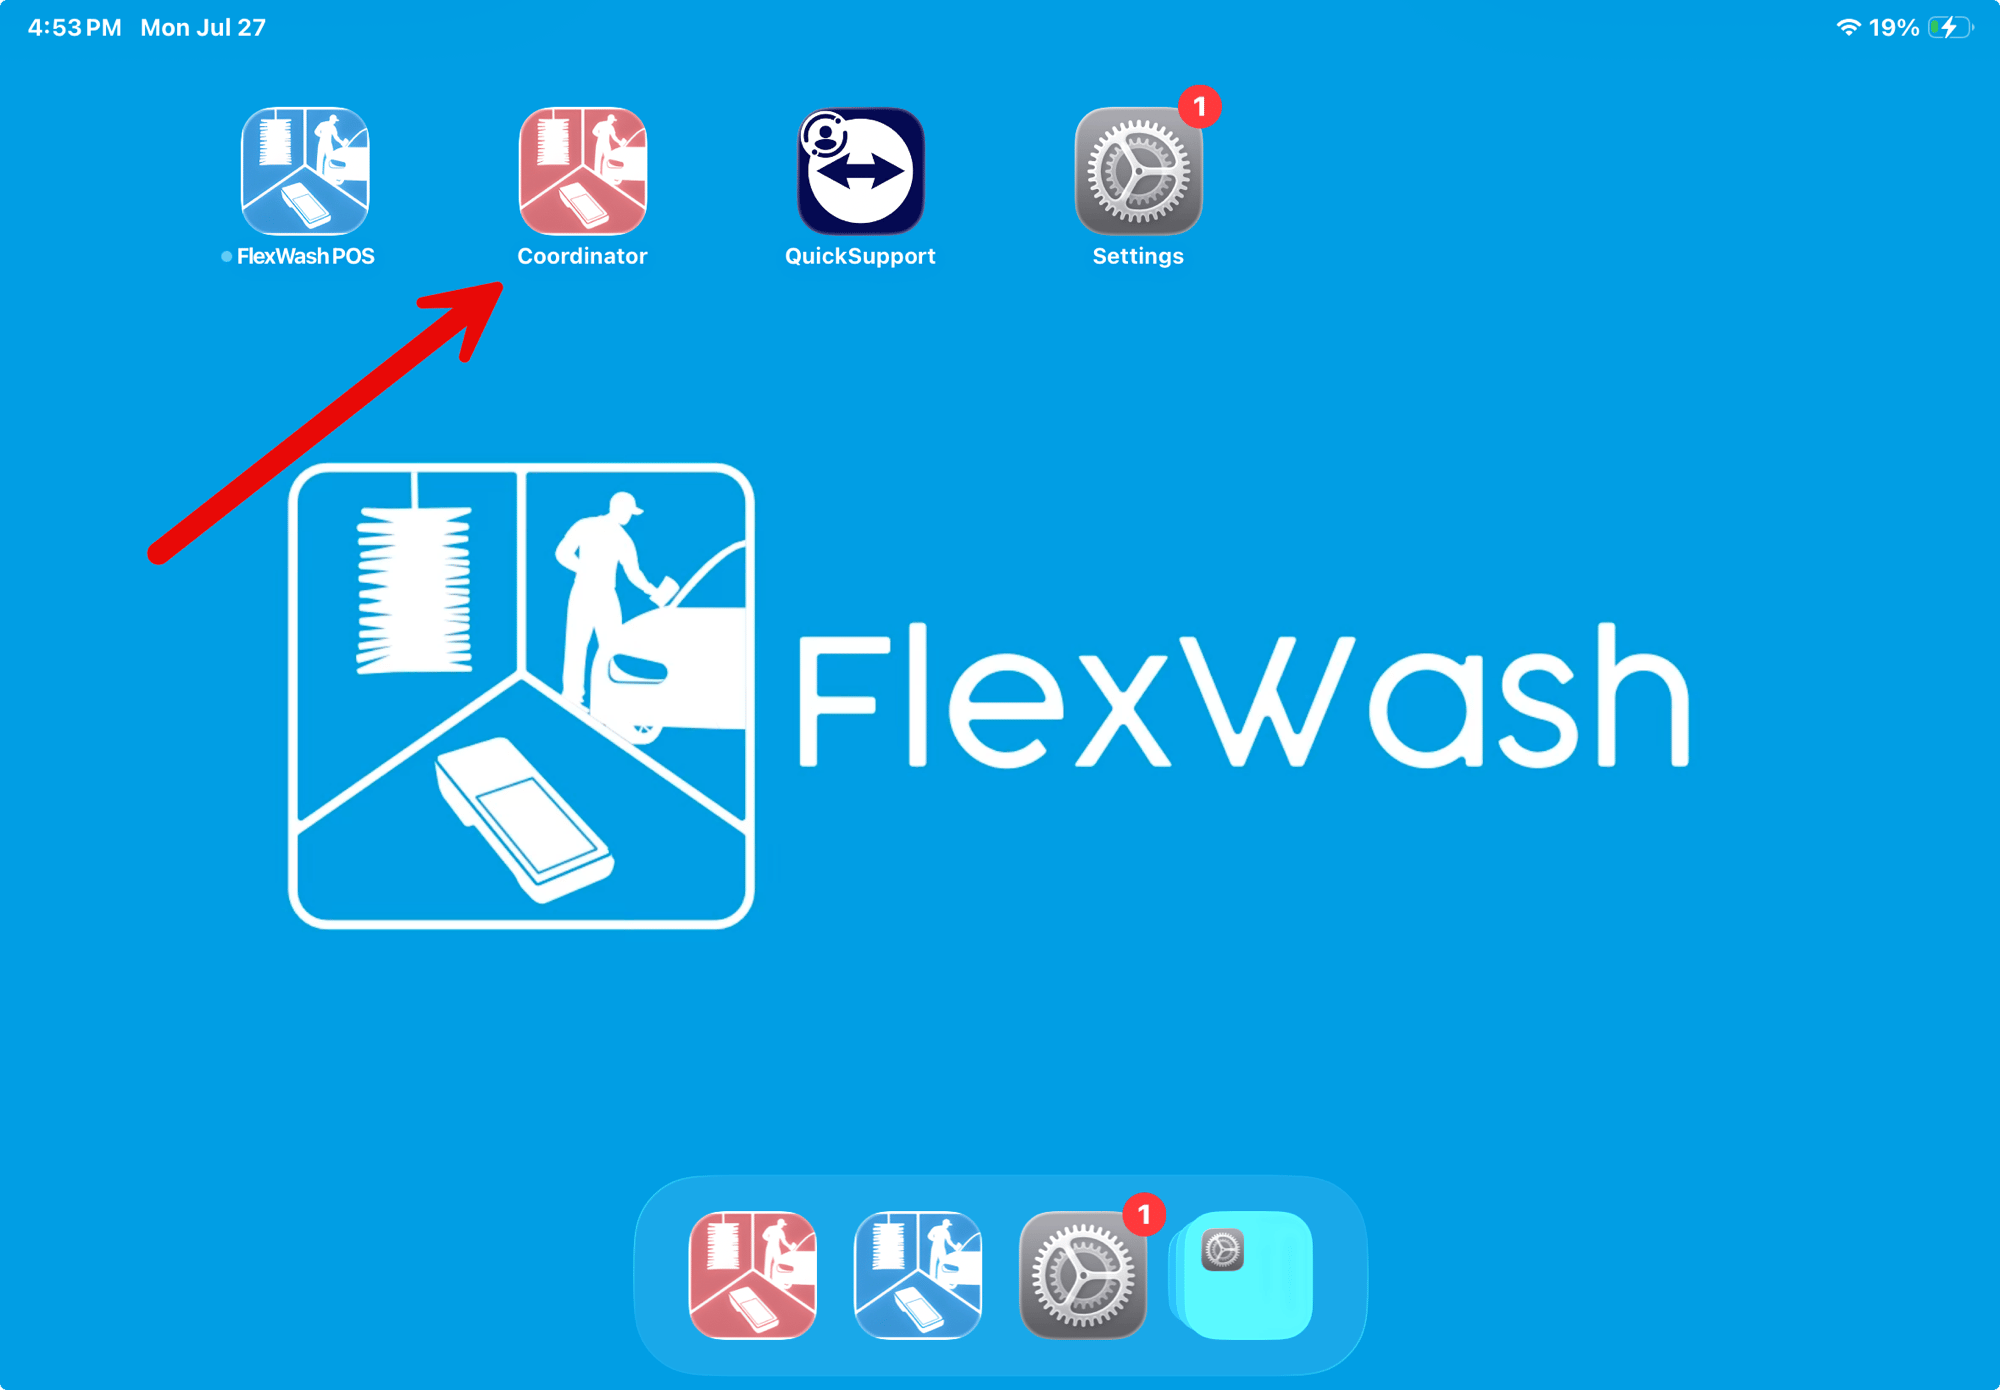
On the pay tablet, open the **Coordinator** app, then tap **RFID Calibration**.
When processing members, the RFID reader identifies the vehicle at the
head of the queue which triggers the gate. Aiming and calibration decides whether
a member drives through without stopping, sits at a closed gate, or watches the gate open for the car behind.
RFID is the better choice than [LPR](/getting-started/equipment-installation/lpr-installation) wherever a plate is hard to read reliably: privacy
or tinted covers, vanity plates with unusual or ambiguous character sets such as 0 and O or 8 and B, and plates obscured by mud,
road salt, or snow.
## Read Zone
The RFID reader emits a directional beam of radio energy, typically referred
to as the **read zone**. A tag is detected only when it sits inside
this zone with enough signal strength to be picked up.
### What to Avoid
* Bad aiming and calibration can cause the reader to detect the **second vehicle
in line**, behind the lead car, opening the gate for the wrong member.
* **Drive-by traffic** in adjacent lanes, parking areas, or the street. A stray
read of a member tag opens the gate unnecessarily, inflates the car count, and
confuses the queue.
## Mounting and Aim
There are two mounting approaches that reliably contain the read zone to the lead vehicle.
### Side Mount, Angled Down and Inward
Mount the reader on a post or pole beside the lane, at roughly windshield
height. Aim the antenna **down and toward the center of the lane**, so the beam
meets the pavement just in front of the gate.
This is the most common installation. The downward tilt prevents the beam from
reaching the next car in line. The inward angle keeps it off adjacent traffic.
### Overhead Mount, Pointing Straight Down
Mount the reader on a canopy or arch directly above the stop position, with
the antenna pointing **straight down**. The read zone forms a tight footprint
on the pavement directly under the antenna.
Overhead mounting is the cleanest option when the site has existing structure
to support it.
Aimed too high or too far out, the beam reaches the next car in line or the
adjacent lane.
### Tag Placement
Mount the tag on the inside of the windshield, usually in the bottom driver-side
corner. Some makes and models need a different position because of thicker glass
or RFID-blocking coatings. Windshield glass and body metal both weaken the
signal, so where the tag sits changes how it reads.
Always test with the tag mounted on an actual vehicle. A tag held in open air
or walked through the lane reads far stronger than the same tag behind glass,
and any tuning done against it will not hold up with real traffic.
## Network
Our RFID readers are PoE (Power over Ethernet). A single CAT5E cable carries
both power and data, so the only wire you run to the mounting location is the
CAT5E. There is no need for a separate power circuit or outlet at the reader.
Terminate the CAT5E at a PoE switch or PoE injector on the network side.
The unit ships with black and red leads for non-PoE power. On a PoE install
these leads are unused. Remove them during installation so they are never
mistaken for a required connection.
## RFID Calibration
Calibration sets how strong a tag's signal has to be before the lane accepts
it, which is what stops the reader picking up the car behind or the lane next
door.
Two levers control what a lane reads. The **physical aim** of the unit sets
where it looks; the **slider** sets how sensitive it is. Confirm the aim first,
then use the slider to fine-tune. A slider cannot correct a beam pointed at the
wrong place.
### Signal Strength and RSSI Thresholds
Signal strength appears in dBm, and the values are negative, so closer to zero
is stronger. A -35 read is much stronger than a -60 read, and a tag reads
stronger the closer it sits to the antenna.
Each reader has a **threshold**, the weakest read it will accept. The
coordinator discards anything below it, so a weak read never opens a gate and
never appears in the table.
The slider sets that threshold, anywhere from -80 to 0.
* **Toward -80**, the lane accepts weaker, more distant reads, which widens the
read zone. Go this way when valid member tags get missed within the read zone.
* **Toward 0**, the lane accepts only strong, close-up reads, which tightens the
read zone. Go this way when the reader picks up the car behind or the adjacent lane.
### Opening the Page
On the pay tablet, open the **Coordinator** app, then tap **RFID Calibration**.
 Connect the tablet to the FlexWash network (WiFi or Ethernet) first, or the
Coordinator app will not load.
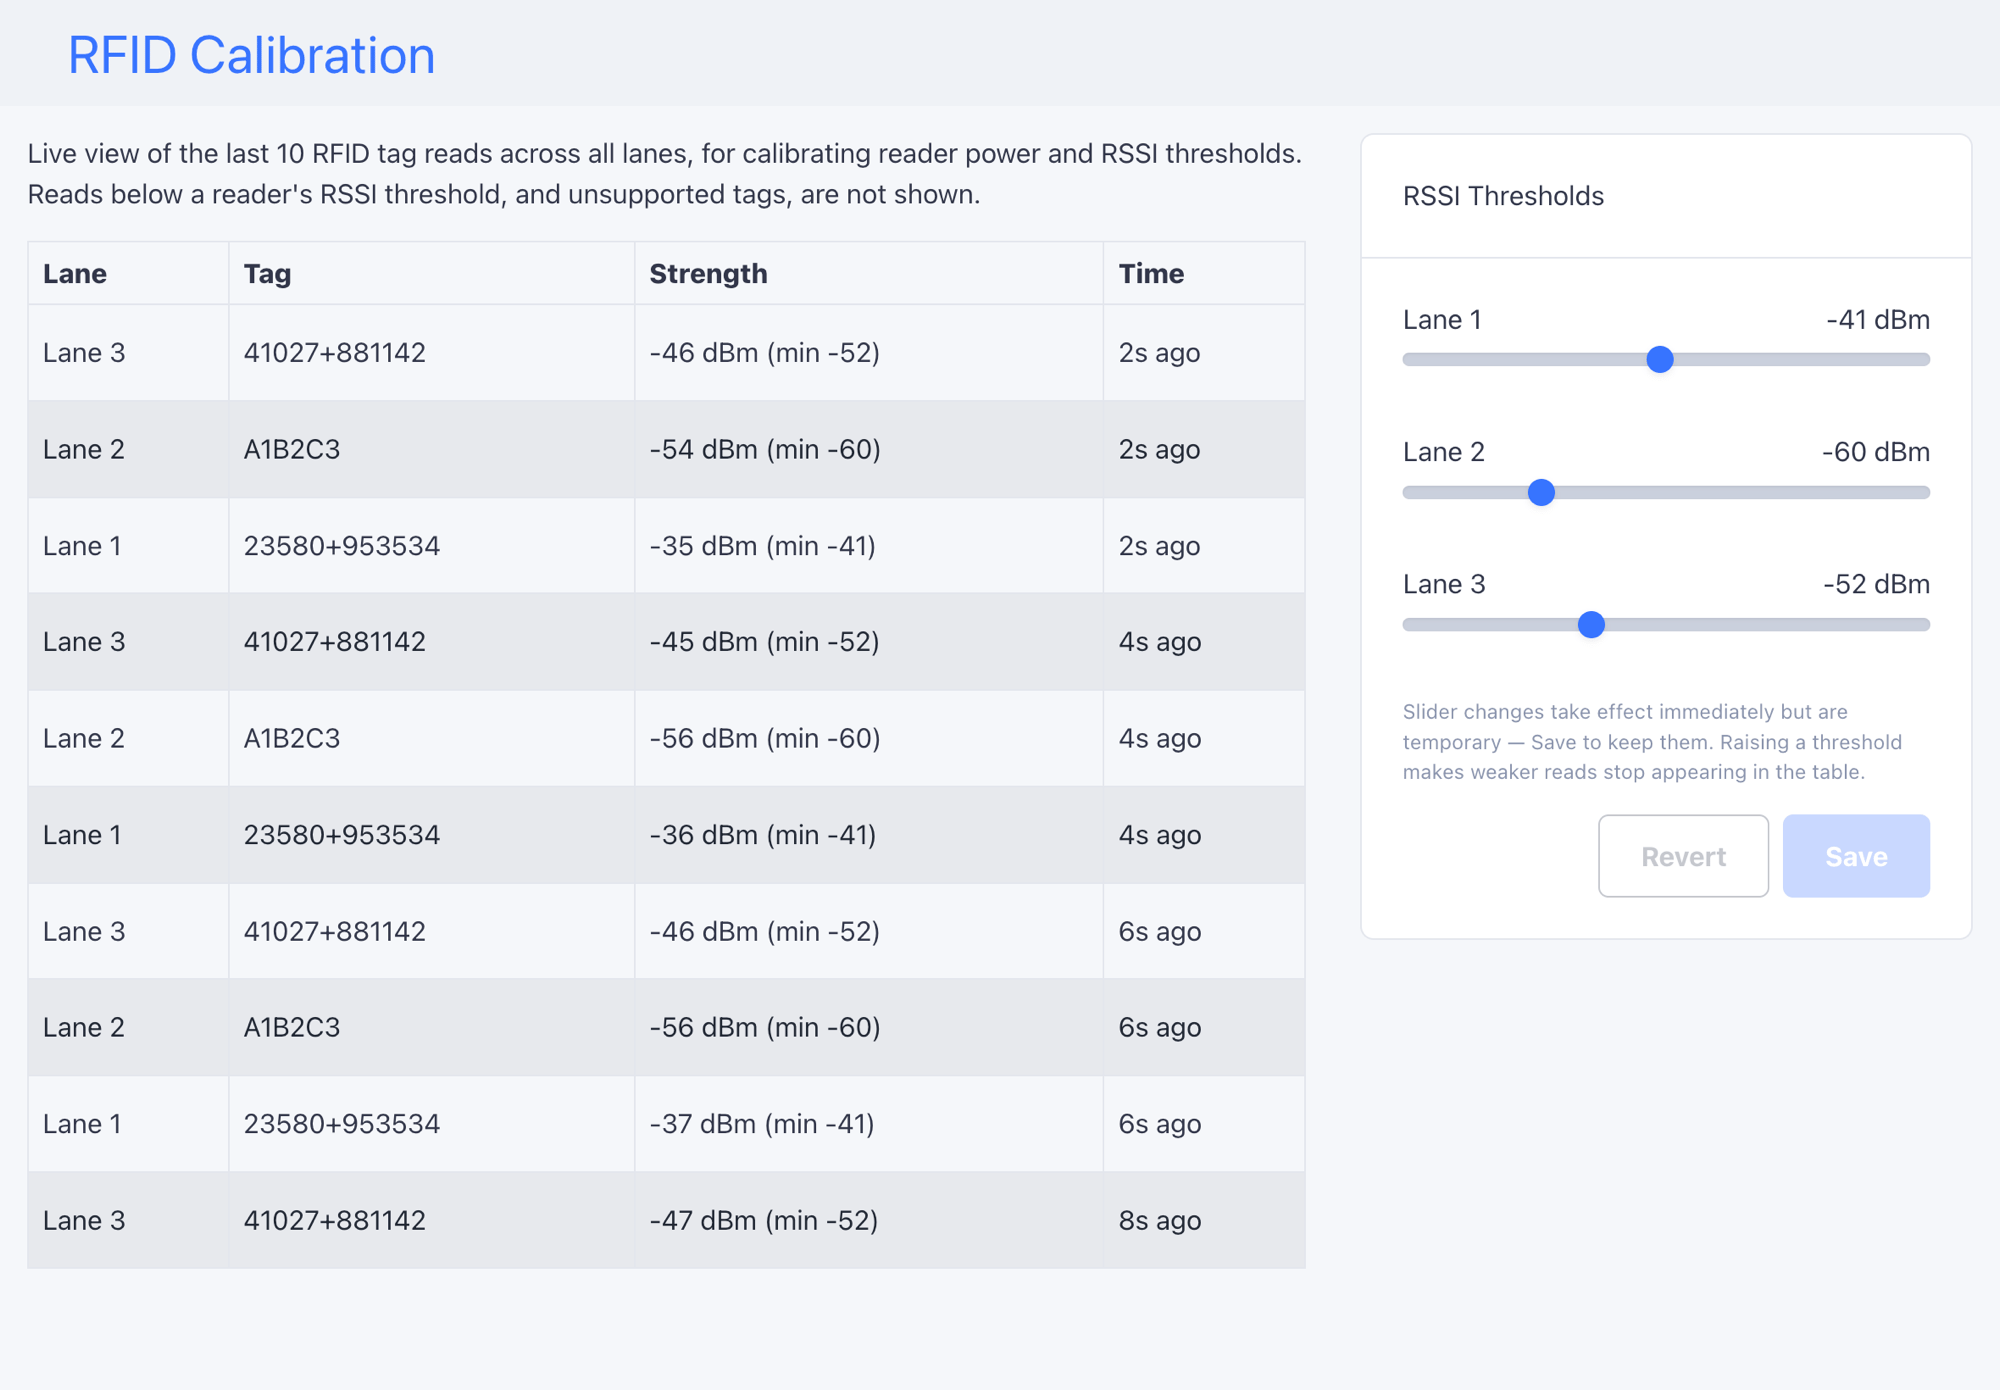
The table on the left shows the last 10 tag reads across all lanes, with
columns for Lane, Tag, Strength, and Time. Strength shows the read value with
the lane's current threshold in parentheses, for example **-46 dBm (min -52)**.
Each RFID reader gets a slider on the right, labeled with its lane.
Reads below a lane's threshold, and unsupported tags, never appear in the
table. If a tag is missing from the table, it was either too weak or not one
of ours.
Connect the tablet to the FlexWash network (WiFi or Ethernet) first, or the
Coordinator app will not load.
The table on the left shows the last 10 tag reads across all lanes, with
columns for Lane, Tag, Strength, and Time. Strength shows the read value with
the lane's current threshold in parentheses, for example **-46 dBm (min -52)**.
Each RFID reader gets a slider on the right, labeled with its lane.
Reads below a lane's threshold, and unsupported tags, never appear in the
table. If a tag is missing from the table, it was either too weak or not one
of ours.
 ### Calibrating a Lane
Each lane is calibrated independently. Work from inside a vehicle with the tag
mounted as described in [Tag Placement](#tag-placement). Never walk a tag
through the lane.
With the tag mounted and the vehicle parked in the read zone, have the pay
tablet ready. You will read the table and move the slider from the
driver's seat.
Drag the lane's slider left to **-80**. The lane now accepts almost any
read, so you can see everything the reader picks up. Slider changes apply
immediately but are discarded unless you save.
Stop **6 feet from the gate**, where members stop for checkout. Note the
**weakest** Strength value you see. This is the read you must never lose.
Back up to **13 feet from the gate**, where the next vehicle waits, and
note the **strongest** read. Then drive through each adjacent lanes and note
the strongest read from there.
Pick a value above everything you saw at 13 feet and from the adjacent
lanes, but comfortably below your weakest read at 6 feet. For example, with -37 at 6
feet and -58 at 13 feet, **-45** is a good setting.
Drive it again. Reads at 6 feet must appear consistently. Reads at 13 feet
and from adjacent lanes must not appear at all. Adjust and repeat until
both hold, then tap **Save**. Until you do the setting is temporary, and
**Revert** undoes it.
Save or Revert before you leave the page. If the tablet is force-closed or
drops off the network with a slider unsaved, the reader keeps the temporary
setting until the next config refresh.
### When Nothing Reads
1. **Open the slider all the way** to -80. If reads appear, the setting was
too strict.
2. **Try another tag**, ideally one already working at a different lane.
3. **Try another vehicle.** Some windshields block RFID outright. See
[Known Interference and Limitations](#known-interference-and-limitations).
4. **Check the hardware** if a known-good tag shows no reads at -80 from
inside two different vehicles. At that point the fault is in the reader,
the cabling, or the PoE port, not the calibration. Work through
[RFID Reader troubleshooting](/technical/hardware/rfid-reader), and contact
support if the reader still will not read.
If reads land at 6 feet but the zone still reaches too far, the fix is physical
rather than numeric. Small changes to antenna tilt move the beam a long way.
Revisit [Mounting and Aim](#mounting-and-aim).
### Known Interference and Limitations
Some vehicles and environments defeat RFID no matter how the lane is tuned.
Check this list before spending time on the slider.
* **RFID-blocking windshields.** Some windshields have metallic or infrared
coatings that block the signal outright. These vehicles are better served by
[LPR](/getting-started/equipment-installation/lpr-installation). See
[LPR and RFID Limitations](/technical/hardware/lpr-rfid).
* **Toll transponders.** A toll tag mounted next to the member tag can
interfere with reads.
* **Garage door openers** clipped near the tag position.
* **Nearby transformers.** Electrical equipment close to the lane raises the
noise floor and weakens reads.
* **Unsupported tags.** Tags that are not ours never appear in the read table
at all, no matter the slider setting.
For troubleshooting power, network, and read failures on an installed reader,
see [RFID Reader](/technical/hardware/rfid-reader). For vehicles that
interfere with RFID at the windshield, see [LPR and RFID Limitations](/technical/hardware/lpr-rfid).
### Calibrating a Lane
Each lane is calibrated independently. Work from inside a vehicle with the tag
mounted as described in [Tag Placement](#tag-placement). Never walk a tag
through the lane.
With the tag mounted and the vehicle parked in the read zone, have the pay
tablet ready. You will read the table and move the slider from the
driver's seat.
Drag the lane's slider left to **-80**. The lane now accepts almost any
read, so you can see everything the reader picks up. Slider changes apply
immediately but are discarded unless you save.
Stop **6 feet from the gate**, where members stop for checkout. Note the
**weakest** Strength value you see. This is the read you must never lose.
Back up to **13 feet from the gate**, where the next vehicle waits, and
note the **strongest** read. Then drive through each adjacent lanes and note
the strongest read from there.
Pick a value above everything you saw at 13 feet and from the adjacent
lanes, but comfortably below your weakest read at 6 feet. For example, with -37 at 6
feet and -58 at 13 feet, **-45** is a good setting.
Drive it again. Reads at 6 feet must appear consistently. Reads at 13 feet
and from adjacent lanes must not appear at all. Adjust and repeat until
both hold, then tap **Save**. Until you do the setting is temporary, and
**Revert** undoes it.
Save or Revert before you leave the page. If the tablet is force-closed or
drops off the network with a slider unsaved, the reader keeps the temporary
setting until the next config refresh.
### When Nothing Reads
1. **Open the slider all the way** to -80. If reads appear, the setting was
too strict.
2. **Try another tag**, ideally one already working at a different lane.
3. **Try another vehicle.** Some windshields block RFID outright. See
[Known Interference and Limitations](#known-interference-and-limitations).
4. **Check the hardware** if a known-good tag shows no reads at -80 from
inside two different vehicles. At that point the fault is in the reader,
the cabling, or the PoE port, not the calibration. Work through
[RFID Reader troubleshooting](/technical/hardware/rfid-reader), and contact
support if the reader still will not read.
If reads land at 6 feet but the zone still reaches too far, the fix is physical
rather than numeric. Small changes to antenna tilt move the beam a long way.
Revisit [Mounting and Aim](#mounting-and-aim).
### Known Interference and Limitations
Some vehicles and environments defeat RFID no matter how the lane is tuned.
Check this list before spending time on the slider.
* **RFID-blocking windshields.** Some windshields have metallic or infrared
coatings that block the signal outright. These vehicles are better served by
[LPR](/getting-started/equipment-installation/lpr-installation). See
[LPR and RFID Limitations](/technical/hardware/lpr-rfid).
* **Toll transponders.** A toll tag mounted next to the member tag can
interfere with reads.
* **Garage door openers** clipped near the tag position.
* **Nearby transformers.** Electrical equipment close to the lane raises the
noise floor and weakens reads.
* **Unsupported tags.** Tags that are not ours never appear in the read table
at all, no matter the slider setting.
For troubleshooting power, network, and read failures on an installed reader,
see [RFID Reader](/technical/hardware/rfid-reader). For vehicles that
interfere with RFID at the windshield, see [LPR and RFID Limitations](/technical/hardware/lpr-rfid).